
Nail Polish Painting offers a captivating realm of creativity, transforming fingertips into miniature canvases. From the simplest solid color to intricate 3D masterpieces, the possibilities are endless. This exploration delves into the diverse techniques, designs, and essential tools required to master this expressive art form, guiding you from beginner-friendly designs to more advanced techniques. Whether you’re a seasoned nail artist or a curious beginner, this guide provides a comprehensive overview to elevate your nail art skills.
We will cover a range of topics, including different application methods like layering and gradient effects, popular design styles such as minimalist, geometric, and floral themes, and the proper preparation and aftercare for achieving long-lasting manicures. Furthermore, we will explore the use of various tools and materials, from brushes and stencils to advanced techniques like marble effects and 3D nail art. Finally, we will provide resources and inspiration to fuel your creativity and help you find your unique nail art style.
Nail Polish Painting Techniques
Achieving professional-looking nail art at home requires mastering several key techniques. This section will explore various application methods, brushstrokes, and a step-by-step guide to a simple yet elegant design. Understanding these techniques will elevate your at-home manicures from basic to beautiful.
Nail Polish Application Techniques
Proper application is fundamental to any successful nail art design. Layering, gradients, and stamping are three popular techniques that add depth and complexity to your manicure. Layering involves applying multiple thin coats of polish to achieve a rich, even color. Gradients create a seamless blend of two or more colors, while stamping utilizes pre-designed images transferred onto the nail.
Brushstroke Techniques in Nail Art
Different brushstrokes create different effects. The following table illustrates various techniques and their resulting appearances. Mastering these will allow for greater creative freedom and precision in your designs.
| Technique | Description | Image Description | Effect |
|---|---|---|---|
| Dotting | Using the tip of a dotting tool or the end of a thin brush to create small dots. | A close-up image showing small, evenly spaced dots of various colors on a nail, possibly forming a pattern like polka dots or a floral design. The dots are crisp and well-defined. | Creates texture, detail, and patterns. |
| Swirling | Creating a circular motion with the brush to blend colors or create a marbled effect. | An image depicting a nail with a swirling pattern of blended colors, perhaps light blues and pinks creating a watercolor-like effect. The transition between colors is smooth and gradual. | Produces a blended, abstract, or marbled look. |
| Stripes | Applying polish in straight lines using a thin brush or striping tape. | An image showcasing a nail with several parallel lines of different colors, creating a clean and geometric design. The lines are straight and evenly spaced. | Creates geometric patterns and clean lines. |
| Freehand | Drawing designs directly onto the nail using a brush, requiring practice and skill. | An image showing a nail with a more complex design, perhaps a flower or abstract shape, painted freehand. The lines may be slightly less perfect but show a creative, artistic style. | Allows for highly creative and personalized designs. |
Creating a Simple Elegant Nail Design: Step-by-Step Guide
This guide outlines the creation of a simple yet elegant design using two contrasting colors.
- Step 1: Base Coat Application. Apply a thin layer of base coat to each nail. Image description: A close-up image showing a clear base coat evenly applied to all nails, providing a smooth surface.
- Step 2: Applying the First Color. Apply two thin coats of a light nude or pastel color, allowing each coat to dry completely. Image description: A close-up shot of nail polish paintingpainted with a pale pink or beige polish, showcasing an even and smooth application.
- Step 3: Creating Accent Stripes. Use a thin brush and a contrasting darker color (e.g., deep burgundy or navy) to paint thin vertical stripes down the center of each nail. Image description: A close-up of nail polish painting with pale pink base and thin, precisely painted dark burgundy vertical stripes. The stripes are straight and evenly spaced.
- Step 4: Top Coat Application. Finish with a top coat to seal the design and add shine. Image description: A close-up showcasing nail polish painting with the completed design, showing a glossy top coat for a smooth and finished look.
Nail Polish Painting Designs and Styles
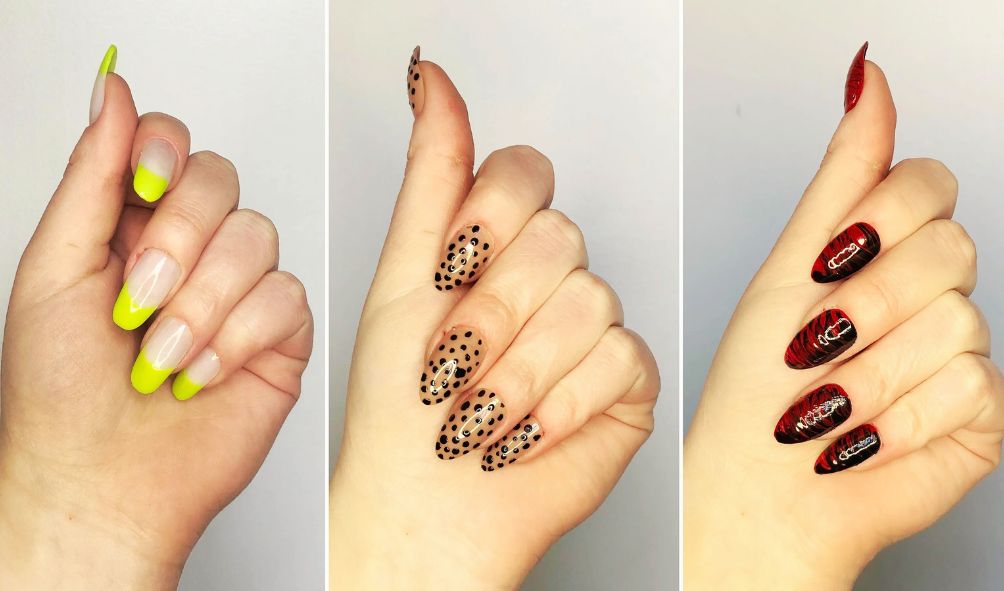
nail polish painting art offers a vast canvas for creativity, allowing for self-expression through a myriad of designs and styles. From subtle elegance to bold statements, the possibilities are endless. Choosing a style depends on personal preference, occasion, and skill level. This section explores several popular styles and trending designs, providing a glimpse into the diverse world of nail polish painting.
Popular nail polish painting styles often reflect current fashion trends and individual aesthetics. Minimalist designs emphasize simplicity and clean lines, while geometric patterns offer structured and modern looks. Floral designs bring a touch of nature’s beauty to the fingertips, and abstract art allows for unrestrained creativity and unique expressions. Each style offers a unique approach to nail polish painting decoration, catering to different tastes and skill sets.
Minimalist Nail Art
Minimalist nail polish painting focuses on simplicity and elegance. Clean lines, subtle colors, and a few carefully placed accents are key elements. This style often incorporates single-color applications, delicate stripes, or tiny dots. A minimalist manicure is perfect for those who prefer a sophisticated and understated look. Examples include a single accent nail with a metallic stripe or a soft pastel shade with a single tiny gold star.
Geometric Nail Art
Geometric nail polish painting utilizes sharp lines, angles, and shapes to create structured and modern designs. This style can range from simple stripes and chevrons to intricate patterns involving triangles, squares, and other geometric forms. Geometric designs can be created using tape for clean lines or freehand painting for a more artistic approach. Popular color combinations include contrasting shades or metallic accents to highlight the geometric shapes. A classic example would be a black and white checkerboard pattern or a series of intersecting lines in vibrant colors.
Floral Nail Art
Floral nail polish painting brings the beauty of nature to your fingertips. This style involves painting flowers, leaves, and other botanical elements onto the nail polish painting. Floral designs can be realistic or stylized, depending on the artist’s skill and preference. They can be incorporated into a variety of manicures, from simple single-flower accents to elaborate arrangements covering the entire nail. Examples range from delicate watercolor blossoms to bold, graphic floral prints. The use of fine brushes and a steady hand are crucial for creating detailed floral designs.
Abstract Nail Art
Abstract nail polish painting offers a canvas for unrestrained creativity. This style allows for the use of various techniques and colors to create unique and non-representational designs. There are no rules or limitations; the focus is on expressing personal creativity and creating visually striking effects. Techniques such as color blending, splatter effects, and freehand brushstrokes are often used to achieve abstract looks. Examples include marbled effects, swirling color gradients, or a mix of contrasting colors splashed across the nail.
Trending Nail Art Designs
The world of nail polish painting is constantly evolving, with new trends emerging regularly. The following list highlights some currently popular designs:
- Chrome Nails: These nails achieve a mirror-like, metallic finish using chrome powder. This creates a futuristic and eye-catching look.
- Negative Space Manicure: This style leaves portions of the nail bare, creating a modern and minimalist effect. Common variations include half-moon or geometric negative space designs.
- 3D Nail Art: This involves using acrylics or gels to create raised textures and designs, adding depth and dimension to the manicure. Popular examples include sculpted flowers or intricate designs.
- Ombre Nails: This technique involves a gradual transition between two or more colors, creating a soft, blended effect. Ombre nails can be achieved using sponges or airbrushing.
Comparison of Design Approaches
Different design approaches lead to vastly different aesthetic results. Comparing ombre and French manicures illustrates this well.
The ombre technique creates a gradual blend of colors, resulting in a soft, diffused look. This approach offers a modern and subtle aesthetic, perfect for everyday wear or special occasions. The transition can be subtle or dramatic, depending on the chosen colors and blending technique.
In contrast, the French manicure features a natural-colored base with a white tip. This classic style provides a clean, elegant look that remains timeless and versatile. While traditionally simple, variations exist, such as using different colors for the tip or incorporating designs within the white tip area.
Tools and Materials for Nail Polish Painting
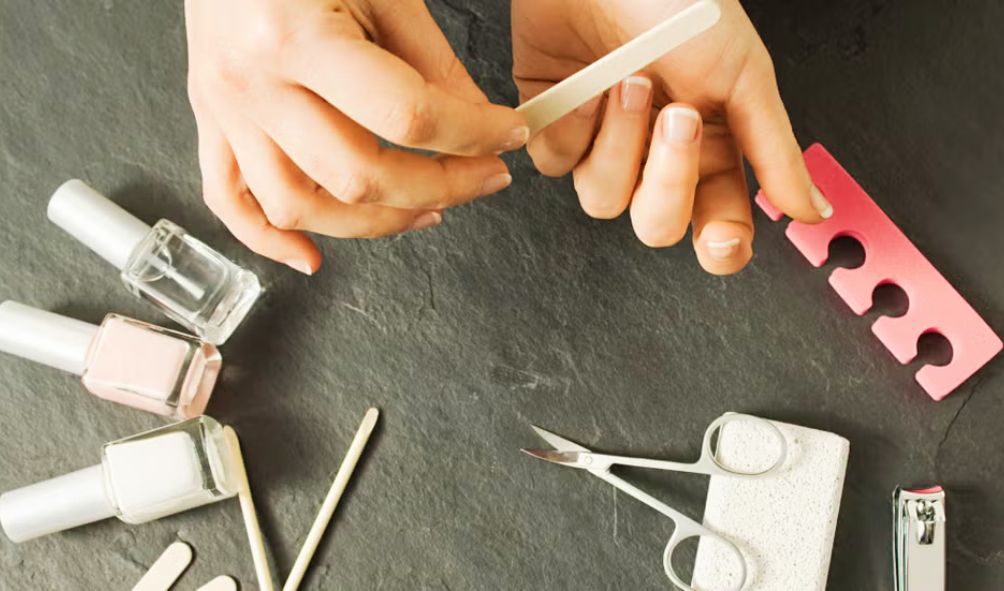
Creating stunning nail art requires the right tools and materials. The quality of your supplies directly impacts the precision, longevity, and overall aesthetic appeal of your designs. Investing in high-quality items will significantly enhance your nail painting experience and results.
Essential Tools and Materials
Choosing the right tools and materials is crucial for achieving professional-looking nail art. The table below outlines the essential items, categorized for easy reference.
| Category | Item | Description | Use |
|---|---|---|---|
| Base Coats & Top Coats | Base Coat | A clear polish that protects the nail and improves adhesion of color. | Applied before color to prevent staining and enhance longevity. |
| Base Coats & Top Coats | Top Coat | A clear polish that seals the design, adds shine, and protects from chipping. | Applied after color and design to protect and add shine. A quick-dry top coat is beneficial for faster drying times. |
| Nail Polish | Various Nail Polish Colors | A wide range of colors, finishes (creams, shimmers, glitters, mattes), and brands. | The foundation of any nail art design; choosing high-quality polish ensures vibrant color and even application. |
| Brushes | Detailing Brush | A fine-tipped brush for intricate designs and details. | Used for precise lines, dots, and small design elements. |
| Brushes | Flat Brush | A flat, broad brush for applying base colors and larger areas. | Ideal for applying solid colors, creating blocks of color, and filling in large spaces. |
| Brushes | Angled Brush | A brush with an angled tip for creating sharp lines and geometric designs. | Useful for creating stripes, V-shapes, and other angular designs. |
| Tools | Dotting Tool | A tool with small balls on the end for creating dots and other small shapes. Can also be substituted with bobby pins or toothpicks. | Used to create polka dots, flowers, and other detailed designs. |
| Tools | Nail Art Tape | Thin adhesive tape for creating clean lines and geometric designs. | Used to create stripes, stencils, and other precise shapes. |
| Preparation | Nail File & Buffer | Used to shape and smooth the nail surface before applying polish. | Ensures a smooth, even surface for optimal polish application and longevity. |
| Preparation | Cuticle Pusher | Used to gently push back cuticles for a clean, neat manicure. | Creates a clean canvas for nail art application. |
| Clean Up | Acetone & Cotton Swabs | Used to remove excess polish and clean up mistakes. | Essential for achieving precise and clean designs. |
Importance of High-Quality Nail Polish and Tools
Using high-quality nail polish painting and tools is paramount for achieving professional-looking results. High-quality polishes tend to have better pigmentation, smoother application, and longer lasting wear. Similarly, durable, well-made brushes allow for greater precision and control, leading to cleaner lines and more intricate designs. Investing in quality supplies minimizes frustration and maximizes the enjoyment of the creative process. For instance, a cheap brush might shed bristles, ruining a carefully crafted design, while a high-quality brush will provide consistent performance and a longer lifespan.
Types of Nail Polish Brushes and Their Uses
Different nail polish painting brushes are designed for specific purposes. The shape and size of the brush significantly influence the application technique and the final outcome. A variety of brushes allows for versatility in creating diverse nail art styles. For example, a fine-tipped brush is ideal for intricate details such as floral designs, while a flat brush is better suited for applying solid colors or creating broad strokes. An angled brush is perfect for achieving sharp lines and geometric patterns. The selection of brushes should align with the desired complexity and style of the nail art.
Nail Preparation and Aftercare
Proper nail preparation and diligent aftercare are crucial for achieving a long-lasting and beautiful manicure. Neglecting these steps can lead to chipping, smudging, and overall dissatisfaction with the final result. This section details the necessary steps to ensure your nail art remains vibrant and flawless for as long as possible.
Preparing your nails involves several key steps to create a smooth, clean canvas for your nail polish painting. This ensures optimal adhesion and prevents premature chipping or peeling. Similarly, proper aftercare helps protect your newly painted nails and maintains their appearance.
Nail Preparation
Preparing your nails for nail polish painting involves several essential steps to ensure a smooth, even surface for the polish to adhere to. This process maximizes the longevity and appearance of your manicure. Begin by removing any existing nail polish painting using a gentle, acetone-free remover to avoid drying out your nails.
Then, gently push back your cuticles using a cuticle pusher or orangewood stick. Avoid cutting your cuticles, as this can lead to infection. Next, shape your nail polish painting using a nail file, moving in one direction to prevent splitting. Finally, gently buff the nail surface to remove any ridges or imperfections, creating a smooth base for the polish. Cleanse the nails with a nail polish painting remover to remove any dust or debris.
Nail Polish Removal
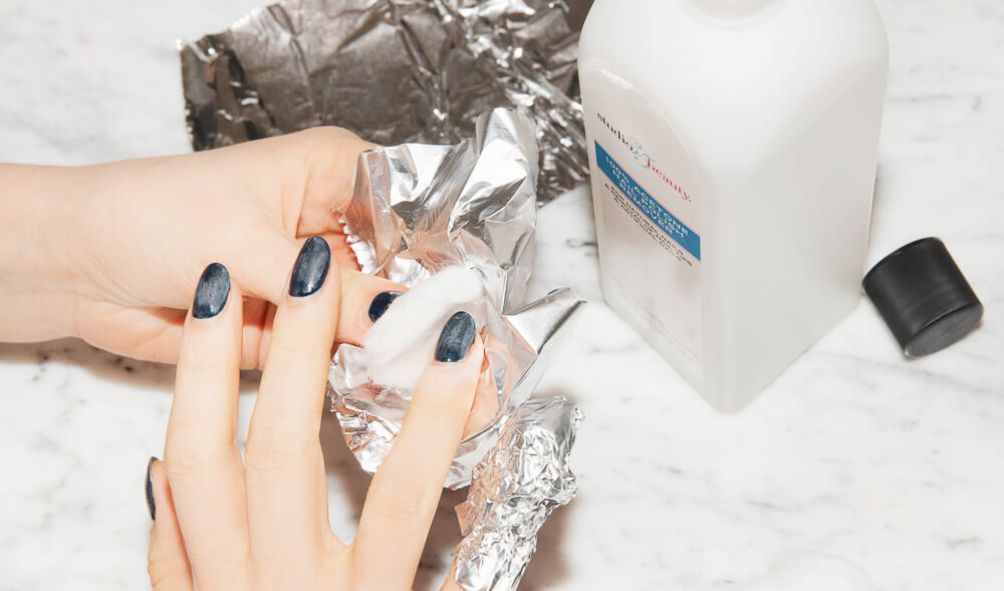
The proper removal of nail polish painting is vital for maintaining nail health and preparing for a new manicure. Begin by saturating a cotton ball or pad with an acetone-free nail polish painting remover. Gently hold the cotton pad against each nail for about 10-15 seconds to soften the polish. Then, gently wipe the polish away, starting from the base of the nail and moving towards the tip. Avoid harsh scrubbing, which can damage your nails. For stubborn polish, repeat the process, ensuring complete removal. After removing the polish, moisturize your nails and cuticles with a nourishing cuticle oil or cream to prevent dryness and brittleness.
Maintaining a Long-Lasting Manicure
Several techniques contribute to a longer-lasting manicure. Applying a base coat before your nail polish painting creates a smooth surface for better adhesion, preventing chipping. Using thin coats of color prevents clumping and allows for faster drying. Applying a top coat seals the color and adds shine, providing a protective layer against chips and scratches. Avoid prolonged exposure to water and harsh chemicals, which can weaken the polish. Regularly applying a top coat every 2-3 days can also significantly extend the life of your manicure. Furthermore, maintaining healthy nails through a balanced diet and proper hydration contributes to a longer-lasting manicure. For example, a diet rich in biotin and protein is known to promote stronger, healthier nails.
Advanced Nail Polish Painting Techniques
Mastering basic nail art techniques is just the beginning. This section delves into more intricate designs and advanced effects, requiring precision and patience, but yielding stunning results. We’ll explore techniques that elevate your nail art from simple to sophisticated.
Intricate Designs Using Various Tools
Creating intricate nail art designs often involves the skillful use of specialized tools. These tools allow for precise application of polish and the creation of detailed patterns. The following techniques demonstrate the versatility of stencils, dotting tools, and striping tape.
Stencils: Stencils provide a simple yet effective method for creating complex designs. Imagine a floral stencil applied to a freshly painted base coat. After carefully applying the stencil, a contrasting polish is dabbed onto the exposed nail surface. Once the polish is dry, the stencil is removed, revealing a sharp, clean floral design. The image would show a vibrant pink base coat with a crisp white floral pattern, demonstrating the precision achievable with stenciling.
Dotting Tools: Dotting tools, available in various sizes, are essential for creating polka dots, flowers, and other intricate designs. For example, to create a daisy, you would use a larger dotting tool for the center and smaller ones for the petals. The image depicts a bright yellow daisy with a black center, the petals carefully placed using dotting tools of varying sizes, showcasing the control and detail this method allows.
Striping Tape: Striping tape offers a clean and precise way to create stripes, geometric patterns, and other linear designs. A simple example would be creating a chevron pattern by applying strips of tape at angles, painting over them, and then removing the tape. The resulting image would show a bold black and white chevron pattern, highlighting the sharp lines and precise angles achievable with striping tape.
Creating 3D Nail Art Designs
3D nail art adds texture and dimension, transforming a flat surface into a miniature work of art. This is achieved through layering techniques and the use of specialized 3D nail art gels or acrylics.
One popular method involves building up layers of gel or acrylic, sculpting them into desired shapes like flowers or jewels. Each layer is cured under a UV lamp, ensuring durability and longevity. A finished example might depict a sculpted rose, its petals meticulously formed and colored, sitting prominently on a neutral base coat. The image would showcase the depth and texture achieved through the layering process, giving the rose a three-dimensional appearance.
Achieving Marble and Water Decal Effects
These advanced techniques create unique and visually striking nail art designs.
Marble Effect: The marble effect is achieved by carefully swirling different colored polishes in a cup of water. A base coat is applied to the nail, then the nail is dipped into the water, collecting the swirling colors. The image would show a beautiful blend of blues and greens, creating a unique, natural-looking marble effect. The variation in color and the subtle swirling patterns demonstrate the unpredictable yet beautiful nature of this technique.
Water Decals: Water decals are pre-printed images that are transferred onto the nail using water. After applying a base coat, the decal is carefully placed onto the nail, and excess water is removed. A top coat seals the decal, creating a long-lasting design. The image might showcase a complex, detailed image like a small landscape scene, flawlessly transferred onto the nail, demonstrating the precision and detail that water decals offer.
Inspiration and Resources for Nail Polish Painting
Finding inspiration and accessing reliable resources are crucial for developing your nail art skills and staying current with trends. A wealth of information and creative ideas is available online and through the work of established nail artists. This section will highlight key resources and influential artists to fuel your creativity.
Valuable Online Resources for Nail Art Inspiration
Numerous online platforms offer a vast collection of nail art designs, tutorials, and techniques. These resources provide inspiration, practical guidance, and a community of fellow nail art enthusiasts. Access to these resources is vital for both beginners and experienced nail artists looking to expand their skillset and discover new trends.
- Websites: Nailpro, a professional nail industry magazine website, offers articles, tutorials, and product reviews. Additionally, sites like Pinterest and Instagram are treasure troves of nail art inspiration, showcasing a vast range of designs and styles from both professional artists and hobbyists.
- Blogs: Many beauty and nail art bloggers share their creations, tutorials, and reviews, providing valuable insights and inspiration. Searching for specific nail art styles or techniques on platforms like WordPress or Blogger will reveal numerous dedicated blogs.
- Social Media Accounts: Instagram and TikTok are particularly rich sources of inspiration. Searching hashtags like #nailartist, #nailart, #naildesigns, and #nailinspo will yield countless images and videos showcasing diverse techniques and designs. YouTube also offers a plethora of nail polish painting tutorials from various artists at different skill levels.
Prominent Nail Artists and Their Signature Styles
Many talented nail polish painting artists have cultivated unique styles and techniques, influencing the broader nail art community. Studying their work can inspire creativity and help refine personal artistic expression. Their expertise offers valuable learning opportunities for aspiring nail polish painting artists.
- Nail artist A (fictional example): Known for intricate, hand-painted floral designs, often incorporating delicate shading and realistic details. Their signature style uses a minimalist color palette, emphasizing the intricate detail of the floral motifs.
- Nail artist B (fictional example): Specializes in bold, geometric designs, often utilizing vibrant color blocking and negative space techniques. Their work showcases clean lines and precise execution, demonstrating mastery of geometric shapes and color theory.
- Nail artist C (fictional example): Famous for their abstract and textured nail polish painting. They experiment with unconventional materials and techniques, resulting in unique, three-dimensional effects. Their style is characterized by unpredictable forms and a focus on texture and depth.
Mood Board: Color Palettes and Design Themes
A mood board helps visualize various color palettes and design themes for nail polish painting projects. It serves as a visual reference point for brainstorming and planning, aiding in the creation of cohesive and aesthetically pleasing nail polish painting designs. The following descriptions represent potential mood board images:
- Image 1: “Sunset Hues”: This image depicts a gradient of warm colors, transitioning from soft oranges and pinks at the base to deep reds and purples at the tips. This palette evokes a feeling of warmth and tranquility, perfect for summer or autumn designs. The design could feature abstract swirls or a simple ombre effect.
- Image 2: “Midnight Bloom”: This image showcases deep blues, purples, and blacks, accented with metallic silver or gold. The overall feel is dark, mysterious, and elegant. The design could incorporate dark floral elements or geometric patterns with metallic accents.
- Image 3: “Tropical Paradise”: This image features bright, vibrant colors such as turquoise, coral, and lime green. It suggests a fun, summery, and playful aesthetic. The design could include tropical flowers, palm leaves, or abstract patterns reflecting the vibrancy of a tropical landscape.
Final Summary
Ultimately, mastering nail polish painting is a journey of exploration and self-expression. By understanding the techniques, utilizing the right tools, and drawing inspiration from diverse sources, you can unlock your creative potential and transform your nails into stunning works of art. Whether you prefer minimalist elegance or bold, intricate designs, the world of nail polish painting awaits, offering endless opportunities to experiment and showcase your personal style. Embrace the process, enjoy the creativity, and let your nails reflect your unique personality.
Read More:
- Best Drawing Tablets for Artists
- Sell Art Online and Make Money
- How to Start a Resin Art Business: Best Guide for Beginners in 2025