

Acrylic Pouring Recipe: Dive into the captivating world of fluid acrylics! This guide unveils the secrets to creating stunning, vibrant artwork using a variety of pouring techniques. We’ll explore everything from mastering paint ratios and color mixing to perfecting surface preparation and troubleshooting common issues. Prepare to unlock your inner artist and transform your canvases into mesmerizing masterpieces.
Whether you’re a seasoned artist or a curious beginner, this comprehensive resource will equip you with the knowledge and confidence to embark on your acrylic pouring journey. We’ll cover the fundamentals of different pouring methods, such as flip-cup, dirty pour, and puddle pour, detailing the nuances of each technique and providing tips for achieving unique effects. Get ready to experiment with colors, textures, and styles, ultimately creating one-of-a-kind pieces of art.
Introduction to Acrylic Pouring
Acrylic pouring is a vibrant and expressive painting technique that yields stunning, unpredictable results. It involves pouring acrylic paints onto a canvas or other surface, allowing the colors to blend and flow organically to create unique abstract art. The beauty of this method lies in its improvisational nature; the final artwork is often a surprise, reflecting the interplay of colors and the artist’s chosen technique.
Acrylic pouring relies on the principles of fluid dynamics and surface tension. The viscosity of the paint, modified through the addition of mediums, dictates how it flows and interacts with other colors. Surface tension creates cell structures and interesting patterns as the paint settles. The artist manipulates these forces through various pouring techniques to achieve different effects.
Acrylic Pouring Techniques
Several techniques exist, each offering a unique approach to manipulating the paint’s flow and creating distinct visual textures. The choice of technique influences the final appearance of the artwork significantly.
- Flip-Cup Pour: This technique involves mixing paints in a cup, then quickly inverting the cup onto the canvas. The paints spill out and create a dynamic, often unpredictable blend of colors. The resulting artwork is characterized by its spontaneous and energetic aesthetic.
- Dirty Pour: In a dirty pour, multiple colors are layered in a cup, creating a marbled effect. This mixture is then poured onto the canvas, resulting in a more controlled, yet still organic, blend of colors. The layers of color are more visible compared to the flip-cup method.
- Puddle Pour: This technique involves pouring individual puddles of color onto the canvas, allowing them to blend slowly and organically. It often results in softer transitions between colors and a calmer, more serene aesthetic than the previous methods. This method allows for greater control over color placement.
Materials Needed for Acrylic Pouring
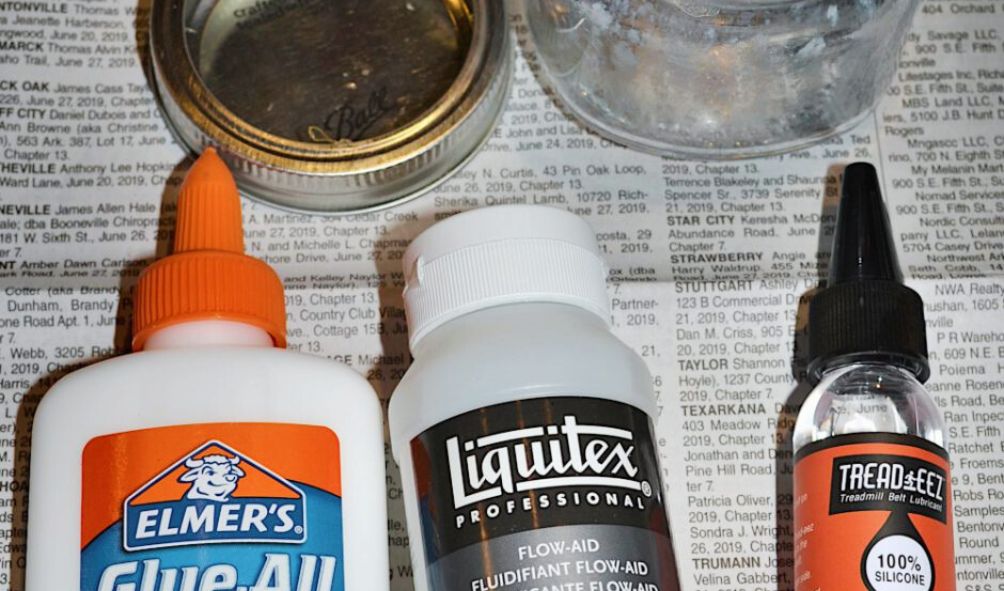
Gathering the right materials is crucial for a successful acrylic pouring experience. The quality of materials can impact the fluidity of the paints and the longevity of the finished artwork.
- Acrylic Paints: High-quality acrylic paints are recommended for vibrant colors and better flow. A range of colors allows for greater creative expression.
- Pouring Medium: This is essential for adjusting the viscosity of the paints, allowing them to flow smoothly and create the desired effect. Common pouring mediums include silicone oil, polycrylic, and floetrel.
- Canvas or Surface: A variety of surfaces can be used, including canvases, wood panels, and even ceramic tiles. The surface should be appropriately sized for the chosen pouring technique.
- Mixing Cups and Tools: Disposable cups are ideal for mixing paints and preventing cross-contamination. Other useful tools include stirring sticks, gloves, and a palette knife for spreading or creating additional texture.
- Protective Gear: Gloves are recommended to protect your hands from the paints and mediums. An apron or old clothing is also advisable to avoid spills.
Acrylic Pouring Recipe Variations
Acrylic pouring offers a delightful degree of flexibility, allowing artists to experiment with various paint-to-medium ratios and pouring mediums to achieve unique textures and cell structures. Understanding these variations is key to mastering the technique and producing consistently desirable results. The following sections detail the impact of different ratios and mediums on the final pour.
Paint Ratio and Consistency Effects
The ratio of acrylic paint to pouring medium significantly influences the final pour’s consistency and the resulting artwork’s appearance. A higher paint concentration leads to a thicker, less fluid pour, resulting in bolder, less-defined cells and potentially a more textured surface. Conversely, a lower paint concentration yields a thinner, more fluid pour, producing smaller, more delicate cells and a smoother finish. Experimentation is encouraged to find the perfect balance for your desired aesthetic. The type of pouring medium also plays a crucial role.
Pouring Medium Impact on Cell Formation and Flow
Different pouring mediums affect cell formation and paint flow in distinct ways. Silicone oil, a popular choice, creates larger, more dramatic cells due to its ability to reduce surface tension. Water, on the other hand, produces smaller, more subtle cells and a less dramatic flow. The viscosity of the pouring medium itself also influences the overall fluidity of the paint mixture. Thicker mediums will result in a slower flow and larger cells, while thinner mediums lead to a faster flow and smaller cells. The interplay between paint concentration and medium type allows for a vast range of artistic possibilities.
Achieving Various Paint Viscosities for Different Pouring Techniques
Achieving the correct paint viscosity is crucial for different pouring techniques. For example, a thicker, more viscous mixture is needed for techniques like flip-cup pouring, while a thinner mixture is better suited for techniques like a dirty pour. The table below illustrates different ratios and their resulting consistencies:
| Paint | Pouring Medium | Ratio | Consistency |
|---|---|---|---|
| Acrylic Paint | Silicone Oil | 1:1 | Medium Viscosity – Ideal for many techniques |
| Acrylic Paint | Water | 1:2 | Low Viscosity – Suitable for Dirty Pour or other fluid techniques |
| Acrylic Paint | Floetrel | 1:1 | High Viscosity – Good for Flip Cup Pour |
| Acrylic Paint | Polyurethane Pouring Medium | 2:1 | Very High Viscosity – Suitable for techniques requiring thick, slow flow |
Pigment Selection and Color Mixing
The success of your acrylic pouring artwork hinges significantly on the quality of your paints and your skill in blending them. Using high-quality acrylic paints ensures vibrant, consistent colors and a smooth pouring process. Poor quality paints can lead to dull, uneven colors, and even separation within the pour, ruining the final effect. Understanding color mixing techniques is equally crucial for achieving your artistic vision.
High-quality acrylic paints are characterized by their rich pigmentation, excellent flow, and minimal settling. These qualities are essential for creating the dynamic fluid movement and captivating color blends characteristic of acrylic pouring. Brands known for their high-quality artist-grade acrylics are generally preferred, although many artists find success with student-grade paints as well. The key difference lies in pigment concentration; artist-grade paints usually have a higher pigment load resulting in more intense and vibrant colors.
Using High-Quality Acrylic Paints for Pouring
Employing high-quality acrylic paints offers several advantages in acrylic pouring. The higher pigment concentration ensures intense and vibrant colors that remain consistent throughout the painting process. The improved flow characteristics facilitate easier blending and pouring, minimizing streaks and uneven color distribution. This leads to a more fluid and dynamic final product. Furthermore, the reduced settling minimizes the need for frequent stirring, streamlining the painting process. The overall result is a smoother, more professional-looking piece of art.
Effective Color Mixing Strategies
Achieving specific color effects in acrylic pouring requires a strategic approach to color mixing. Creating gradients, for instance, involves a gradual transition between two or more colors. This can be achieved by meticulously layering colors of varying shades or by using a pouring technique that encourages the colors to blend organically. Achieving vibrant hues necessitates understanding the color wheel and how colors interact. Mixing complementary colors (those opposite each other on the color wheel) can produce intense, bright hues, while mixing analogous colors (those next to each other on the wheel) creates more subtle and harmonious blends.
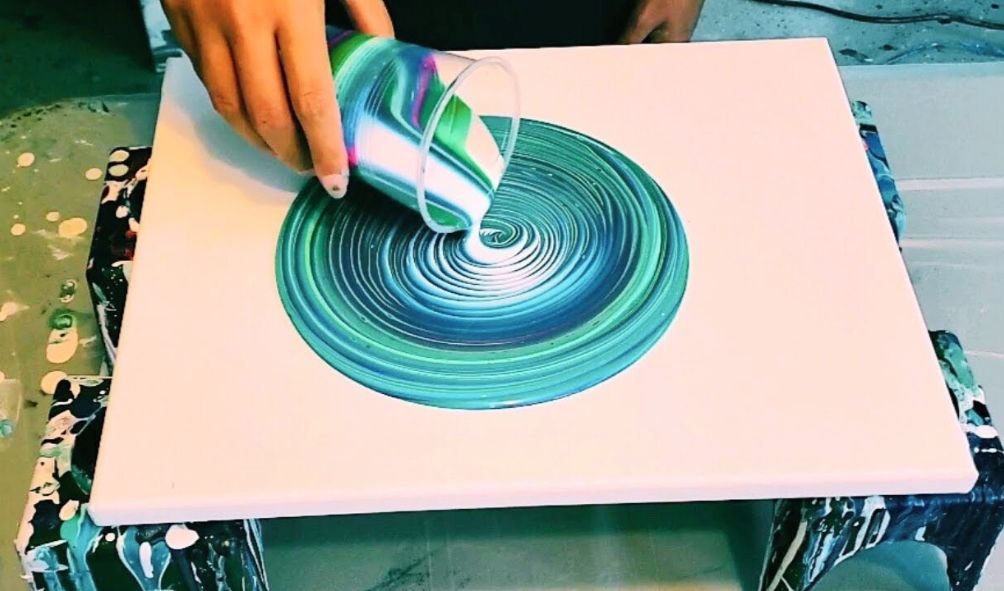
Ocean Scene Color Palette
For an ocean scene, a palette incorporating blues, greens, and whites, along with touches of brown and perhaps even a hint of purple, is effective. Deep blues represent the deeper ocean depths, while lighter blues and turquoise represent shallower waters. Greens can be used to depict seaweed or algae. Whites and light blues create highlights and foam effects. Browns represent the sandy seabed or rocks. A subtle addition of purple can add depth and mystery to the darker areas. This palette mimics the natural color gradients observed in oceans, creating a realistic and visually appealing effect. The rationale is to build depth and realism by using a variety of blues and greens, with the whites and browns creating visual contrast and points of interest.
Surface Preparation and Canvas Selection
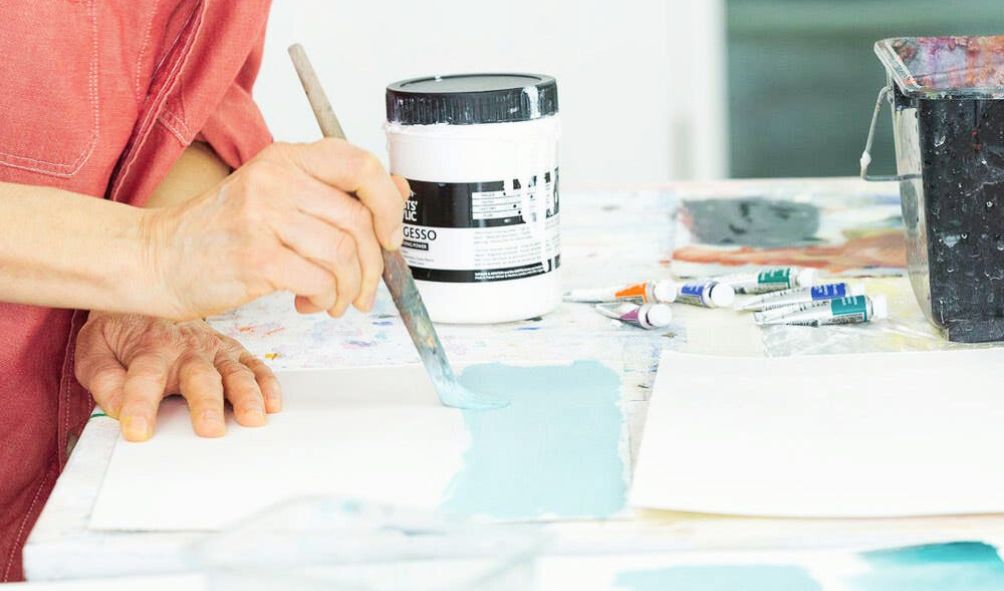
Proper surface preparation is crucial for successful acrylic pouring. The chosen surface significantly impacts the final look and longevity of your artwork, influencing how the paint flows and adheres. Different surfaces require different preparation methods to ensure optimal results and prevent paint absorption, which can lead to dull colors and cracking.
Preparing different surfaces involves cleaning, priming, and potentially sealing the substrate. This process enhances paint adhesion, creates a uniform surface for even paint flow, and protects the artwork from damage over time. Canvas size and type also play a vital role, affecting the feasibility of specific pouring techniques and the overall scale of the artwork.
Canvas Preparation
Canvas preparation begins with a thorough cleaning. Dust, debris, and oils from handling can interfere with paint adhesion. Gently wipe the canvas with a clean, damp cloth. For canvases that have been previously used, a mild soap solution can be employed, followed by a thorough rinsing and complete drying. Once clean and dry, priming is essential. A gesso primer is commonly used; it creates a smooth, even surface and improves paint adhesion. Apply at least two coats of gesso, allowing each coat to dry completely before applying the next. The gesso should be applied evenly, avoiding drips or thick clumps. After the final gesso coat is dry, consider sealing the canvas. A clear acrylic sealer, applied thinly and evenly, creates a barrier preventing paint absorption and enhancing the vibrancy of colors. This is especially recommended for absorbent materials like raw canvas or wood panels.
Wood Panel Preparation
Wood panels, like canvases, benefit from a thorough cleaning before painting. Any dust or debris should be removed using a damp cloth. Similar to canvases, wood panels should be primed before painting to create a uniform surface and improve paint adhesion. A gesso primer, or a specialized wood primer, is recommended. Apply at least two coats, allowing each coat to dry completely between applications. For porous wood types, you might need to apply more coats to achieve a smooth, non-absorbent surface. Once the primer is completely dry, sealing the wood panel with a clear acrylic sealer is highly recommended to prevent paint absorption and protect the artwork from potential moisture damage.
Canvas Size and Type Selection
The size and type of canvas significantly influence the practicality of various pouring techniques. Larger canvases (e.g., 24×36 inches or larger) are better suited for techniques like the flip-cup pour or dirty pour, which involve larger volumes of paint and more dynamic movement. Smaller canvases (e.g., 12×16 inches or smaller) work well with techniques like the swipe or puddle pour, which require less paint and offer more control over the design. Canvas type also matters; gallery-wrapped canvases offer a finished edge, while stretched canvases require additional framing. The choice depends on your preference and the overall aesthetic you aim to achieve. For beginners, smaller canvases offer a more manageable starting point for mastering the techniques.
Pouring Techniques and Methods
Acrylic pouring offers a diverse range of techniques, each yielding unique visual effects. The choice of technique significantly impacts the final artwork’s appearance, from the size and distribution of cells to the overall color harmony. Mastering several techniques allows for greater creative control and the exploration of a wider spectrum of artistic styles.
Flip-Cup Pour
The flip-cup pour is a beginner-friendly technique that produces relatively predictable results. It involves mixing your acrylic paints with pouring medium in separate cups, then carefully layering these mixtures into a larger cup. The cup is then inverted onto the canvas, allowing the paint to flow and spread organically. The resulting artwork often features a central concentration of color, gradually transitioning outwards.
The process begins with preparing your paint mixtures in individual cups. Each cup contains a different color or color combination. Once prepared, carefully pour the mixtures into a larger cup, maintaining distinct layers. This layering is crucial to the effect. Then, quickly invert the cup onto your prepared canvas, ensuring even contact. After a few seconds, lift the cup and allow the paint to settle. A gentle rocking motion can encourage further blending. The flip-cup pour typically results in a relatively controlled pour with less dramatic cell formation compared to other techniques.
Dirty Pour
The dirty pour is a more dynamic technique that creates unpredictable and often highly textured results. It involves mixing all your colors together in one cup, creating a “dirty” mixture. This mixture is then poured onto the canvas, often using a variety of pouring methods, including directly pouring from the cup, or using a separate cup for each color. The chaotic nature of this technique often leads to unexpected and exciting results.
Begin by mixing all your chosen colors together in a single cup, stirring gently to avoid excessive mixing. The goal is to retain some visible separation between colors. Then, pour the mixture onto your prepared canvas. Variations exist, such as using a separate cup to add additional drops of specific colors for more localized color bursts. You can also tilt and rotate the canvas to manipulate the flow of the paint. The dirty pour often creates a high degree of cell formation, with intricate patterns and color blends. It’s known for its unpredictable nature, making each artwork unique.
Swipe Technique
The swipe technique offers a level of control not found in other methods, allowing for deliberate manipulation of color and cell formation. This technique starts with a base layer of paint, usually poured using a different method. Once the base layer is partially dry, additional colors are applied and then swiped across the surface using a palette knife, brush, or even a piece of cardboard. This action creates streaks of color and blends existing colors. The final result is a more controlled and deliberate aesthetic compared to other techniques.
Begin with a base layer, which can be created using any other pouring method. Allow this base to partially dry (a slightly tacky surface is ideal). Then, apply additional colors in streaks or dots. Using your chosen tool (palette knife, brush, etc.), swipe across the surface, blending the new colors with the base layer. The direction and pressure of the swipe significantly influence the final appearance. The swipe technique allows for a high degree of control over color blending and can create a more subtle or dramatic effect depending on the artist’s intent. Cell formation is often less pronounced than in the dirty pour, but still present, particularly if the base layer was created using a cell-forming method.
Comparison of Pouring Techniques
The following table compares the three techniques discussed above, highlighting their respective advantages and disadvantages.
| Technique | Advantages | Disadvantages | Visual Description |
|---|---|---|---|
| Flip-Cup | Easy to learn, relatively predictable results, good for beginners. | Less dynamic than other techniques, fewer cells. | Often features a central concentration of color, gradually blending outwards. Cells are generally smaller and less prominent. Color blending is relatively smooth and even. |
| Dirty Pour | Highly dynamic and unpredictable, creates unique and textured results, high cell formation. | Requires more practice, less control over the final outcome. | Characterized by a chaotic blend of colors, high density of cells of varying sizes and shapes, and often dramatic color contrasts. |
| Swipe | Offers greater control over color blending and cell formation, allows for more deliberate design. | Requires more skill and practice, may be less visually striking than other techniques if not executed well. | Features distinct streaks of color, often with a more controlled and blended appearance than other techniques. Cell formation is usually less prominent, but still visible depending on the base layer. |
Post-Pouring Processes
The post-pouring phase is crucial for achieving a successful acrylic pour painting. Proper handling during this stage significantly impacts the final appearance and longevity of your artwork. Failing to follow these steps can lead to unwanted drips, smudging, or uneven drying, compromising the overall aesthetic appeal.
The most important aspect of post-pouring is allowing the paint to dry undisturbed. This prevents accidental movement of the paint, which could disrupt the cell structure and blend of colors, resulting in an uneven or unsatisfactory finish. The drying time depends on several factors, including the thickness of the paint, the ambient temperature and humidity, and the type of paint used. Generally, allowing the painting to dry for at least 24-72 hours, or even longer in humid conditions, is recommended.
Removing Excess Paint
Excess paint often accumulates along the edges of the canvas after pouring. This excess paint can drip or create an undesirable border around the artwork. Several methods exist to remove this excess paint effectively. One simple method involves carefully using a palette knife or a soft cloth to gently lift and remove the excess paint. For thicker accumulations, a paper towel may be more effective. Another technique is to use a clean, dry brush to carefully dab and lift the excess paint. It is important to work gently and slowly to avoid smudging the already poured paint. The key is to remove the excess paint without disturbing the surface of the artwork.
Achieving Specific Effects During Drying
Controlled manipulation during the drying process can create unique effects. Tilting the canvas at various angles, for example, allows gravity to influence the flow of the paint, creating interesting patterns and color gradients. This technique is best employed while the paint is still wet and flowing. The angle and duration of tilting will determine the extent of the effect. A gentle tilt might create subtle variations, while a more dramatic tilt can result in significant color blending. Another technique involves using a heat gun. However, it is crucial to use the heat gun cautiously and from a distance to avoid damaging the paint or causing unwanted bubbling. The heat can help to accelerate the drying process and potentially enhance the cell structure, making the cells more pronounced. It’s essential to move the heat gun constantly and avoid prolonged exposure to any single area.
Troubleshooting Common Issues
Acrylic pouring, while a visually stunning and rewarding technique, can present some challenges. Understanding common problems and their solutions is key to achieving consistent, high-quality results. This section addresses several frequently encountered issues, providing practical solutions and preventative measures to enhance your pouring experience.
Uneven Color Distribution
Uneven color distribution is a common problem, often resulting in streaks or patches of concentrated pigment. This can stem from inadequate mixing of the paint and pouring medium, insufficient stirring of the paint mixture before pouring, or inconsistent pouring techniques. To remedy this, ensure your paint and pouring medium are thoroughly mixed until a consistent viscosity is achieved. Vigorously stir the final mixture for at least a minute to ensure complete pigment dispersion. Consider using a slow, controlled pouring technique to avoid disturbing the already poured layers. Practice pouring consistently to minimize variations in the application process.
Poor Cell Formation
Insufficient cell formation, resulting in a flat, less textured surface, is another frequent issue. This can be due to several factors including using too much or too little pouring medium, incorrect paint viscosity, or a lack of silicone oil. The ideal ratio of pouring medium to paint will depend on the specific brand and type of paint and pouring medium used, but generally a ratio of 1:1 to 2:1 (pouring medium to paint) is a good starting point. Experiment to find the best ratio for your materials. Using too little silicone oil results in fewer and smaller cells. Adding a few drops of silicone oil (high quality silicone is recommended) can significantly improve cell formation. Remember to always thoroughly mix the silicone oil into the paint mixture.
Bleeding or Muddied Colors
Bleeding or muddied colors can occur when using pigments that are not compatible or when the paint mixture is too thin. Using highly pigmented paints, particularly those with a high concentration of titanium white, can cause this issue. To prevent this, carefully select your pigments and pre-mix small test batches to assess compatibility before committing to a large pour. Ensure that the paint mixture is not overly thin, and adjust the ratio of pouring medium to paint as needed to achieve a good viscosity.
Cracking or Peeling
Cracking or peeling of the paint after pouring can be caused by the use of an unsuitable canvas or insufficient drying time. Using a canvas that is not properly primed or that is not adequately absorbent can lead to cracking. Ensure your canvas is primed with a suitable acrylic gesso, allowing ample drying time between coats. Avoid pouring onto canvases that are too porous or too smooth, as this can affect adhesion. Furthermore, allow the poured painting to dry slowly in a controlled environment to prevent rapid shrinkage and cracking. Avoid placing it in direct sunlight or near a heat source.
Dust or Debris in the Pour
Dust and debris in the finished pour can significantly detract from the aesthetic appeal. This issue can be mitigated by working in a clean, dust-free environment. Consider covering your workspace with a clean drop cloth or plastic sheeting. Use a clean palette knife and containers for mixing your paints. Ensure the pouring surface is also clean and free from dust or debris.
Advanced Techniques and Variations
Acrylic pouring offers a fantastic foundation for creativity, but mastering advanced techniques unlocks a world of unique and stunning effects. This section explores ways to elevate your pours beyond the basics, incorporating new materials and refining your approach to achieve truly exceptional results. We’ll delve into using metallic paints, textural mediums, and other elements to add depth and complexity to your artwork.
Metallic Paints and Shimmer Effects
Metallic acrylic paints add a captivating dimension to acrylic pours, introducing shimmering highlights and luxurious depth. The reflective qualities of these paints create an almost ethereal glow, transforming ordinary pours into breathtaking pieces. Experimenting with different metallic shades, such as gold, silver, copper, or bronze, can significantly alter the overall mood and visual impact of your artwork. Consider using a combination of metallic and non-metallic paints to create interesting contrasts and focal points within your design. For instance, a deep blue base with accents of gold metallic paint can evoke a sense of opulence and mystery.
Texture Mediums for Enhanced Depth
Adding texture mediums to your acrylic pouring mix introduces exciting tactile and visual elements. These mediums, ranging from coarse gels to fine pastes, create a three-dimensional effect, adding depth and interest to the poured surface. The choice of medium will significantly influence the final texture. A heavy-bodied gel medium will create pronounced peaks and valleys, while a finer paste will result in a more subtle, textured surface. Experimenting with different mediums allows you to control the degree of texture and create unique visual effects. For example, incorporating a modeling paste can create a raised, almost sculpted effect within the poured design.
Incorporating Resin and Glitter
Resin and glitter offer exciting possibilities for enhancing the visual appeal and longevity of your acrylic pours. Resin, when carefully applied as a top coat, creates a glossy, protective layer that seals the artwork and enhances its vibrancy. Furthermore, incorporating glitter into your pouring mixture adds shimmering sparkle and creates a dazzling effect. Different glitter sizes and colors can be used to achieve a range of effects, from subtle shimmer to intense sparkle. However, it is important to note that excessive glitter can make the pour difficult to control and may obscure other details in the design. A careful and measured approach is crucial to achieving the desired effect.
Creating Marbled and Layered Effects
Achieving specific effects, like marbling and layering, requires a nuanced understanding of paint viscosity and pouring techniques. A marbled effect is created by carefully pouring contrasting colors onto the canvas, allowing them to blend and swirl organically. The key is to maintain a balance between the fluidity of the paints and the control you exert during the pouring process. Layered effects, on the other hand, involve pouring successive layers of paint, allowing each layer to dry slightly before adding the next. This technique creates a depth and complexity that cannot be achieved with a single pour. Mastering these techniques requires practice and patience, but the results are well worth the effort.
Unique and Innovative Acrylic Pouring Designs
The beauty of acrylic pouring lies in its versatility. Beyond the basic techniques, countless possibilities exist for creating unique and innovative designs. Consider incorporating stencils, creating cell effects, or experimenting with different canvas shapes and sizes to add a personal touch. The possibilities are truly endless, limited only by your imagination and willingness to experiment. For instance, incorporating natural elements such as leaves or flowers before pouring can create intriguing textures and patterns. Similarly, pouring onto a non-traditional surface, like a curved piece of wood, can result in a truly one-of-a-kind artwork.
Last Point
From understanding paint ratios and color harmonies to mastering pouring techniques and troubleshooting common problems, this Acrylic Pouring Recipe guide has provided a comprehensive overview of this exciting art form. Remember, the beauty of acrylic pouring lies in experimentation and self-expression. Don’t be afraid to explore different techniques, colors, and mediums to create your own unique style. Embrace the fluidity, the unexpected results, and the joy of watching your vision come to life on canvas. Happy pouring!
Read More:
- Best Dry Brush Watercolor Tutorial for Beginners in 2025
- 10 Unique Art Ideas: Explore Creative Expression
- How to Start a Resin Art Business: Best Guide for Beginners in 2025