

How to Create a Glitch Effect in Photoshop unlocks a world of creative possibilities. This guide delves into the art of manipulating digital imagery to achieve that distinctive, slightly broken aesthetic, exploring various techniques from simple filters to advanced layer manipulation. We’ll cover a range of glitch styles, from subtle distortions to dramatic data corruption, empowering you to add a unique visual flair to your projects.
From understanding the fundamental principles behind glitch effects to mastering advanced Photoshop techniques, this comprehensive tutorial will equip you with the skills to create stunning visuals. We will explore different methods, including using filters, the Liquify tool, layer styles, and custom brushes, allowing you to tailor your glitches to your specific creative vision. Whether you’re aiming for a retro VHS vibe or a more abstract, digital breakdown, this guide provides the tools and knowledge to bring your vision to life.
Introduction to Glitch Effect in Photoshop
Glitch effects, a captivating visual style, mimic the errors and distortions found in digital and analog media. They add a unique, often unsettling, aesthetic to images and videos, creating a sense of disruption and technological malfunction. This effect is achieved by manipulating the data streams that constitute digital images, resulting in unexpected and visually arresting results.
The creation of glitch effects relies on the manipulation of an image’s underlying data. Digital images are fundamentally grids of numerical data representing color and brightness. By altering this data—introducing errors, corrupting sections, or shifting pixel values—we can create the characteristic visual artifacts associated with glitches. The process often involves techniques like data corruption, color banding, and displacement mapping, all of which exploit the limitations and vulnerabilities of digital image processing.
Types of Glitch Effects
Several distinct types of glitch effects exist, each offering a unique visual character. These variations stem from different methods of data manipulation and the specific artifacts they produce. Understanding these variations allows for a more controlled and creative approach to generating glitch art.
- Data Corruption: This involves intentionally introducing errors into the image’s data stream, leading to pixelation, color shifts, and unexpected patterns. Imagine a photograph where sections suddenly turn into a scrambled mess of colors, a visual representation of corrupted data.
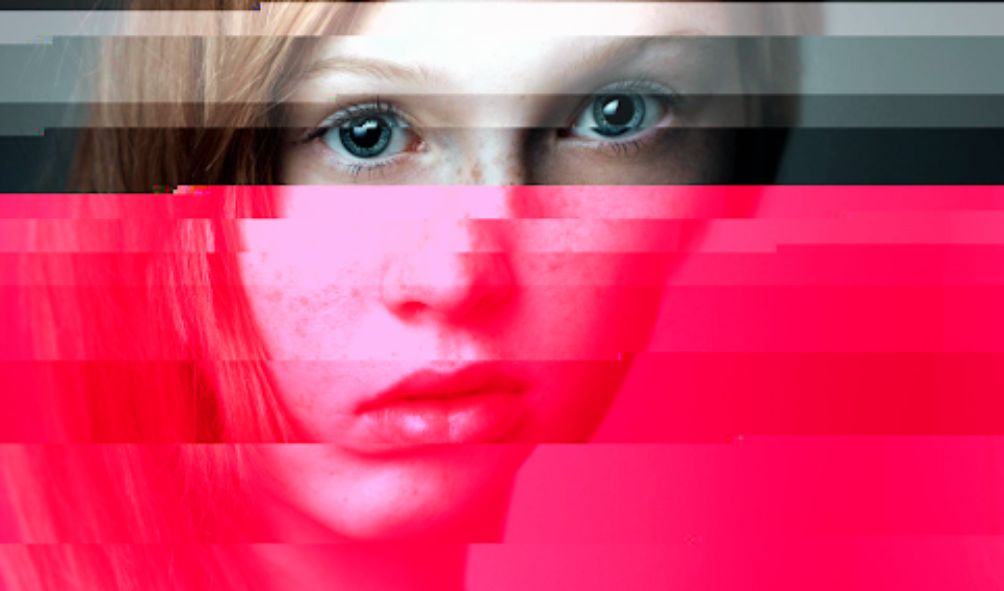
- Color Banding: This effect creates horizontal or vertical stripes of solid color, resulting from limitations in color representation or data compression. It might appear as distinct bands of color across an image, similar to a television signal experiencing interference.
- Displacement Mapping: This technique involves shifting or distorting sections of the image, creating a warped or fragmented look. Picture a face where parts seem to slide or shift out of place, creating a surreal and unsettling effect.
- Pixel Sorting: This involves rearranging the pixels within an image, often along a specific axis, leading to a chaotic and fragmented visual result. This can create a mosaic-like appearance, with sections of the image rearranged and disconnected.
Glitch Art Styles
Glitch art, the artistic application of glitch effects, has evolved into a diverse range of styles, each with its own aesthetic and expressive qualities. These styles often reflect the specific techniques employed and the artistic intent of the creator.
- Abstract Glitch Art: This style focuses on the purely visual aspects of glitches, using them to create abstract compositions and patterns. Imagine a vibrant, chaotic explosion of color and distorted shapes, devoid of recognizable imagery.
- Surreal Glitch Art: This style uses glitches to create surreal and dreamlike images, often distorting or manipulating recognizable subjects to create unexpected and uncanny results. This might involve a distorted portrait, where the subject’s features are subtly or drastically altered by the glitch effect.
- Cyberpunk Glitch Art: This style often incorporates glitches into images that evoke a cyberpunk aesthetic, reflecting themes of technology, dystopia, and urban decay. Think of a cityscape with flickering neon signs and buildings that appear to be disintegrating, with glitch effects highlighting the technological decay.
Methods for Creating Glitch Effects in Photoshop
Creating convincing glitch effects in Photoshop involves manipulating images in ways that disrupt their normal structure, mimicking the visual artifacts of digital corruption. Several techniques can achieve this, ranging from simple filter applications to more complex layer manipulations. Let’s explore some effective methods.
Offset Filter for Displacement Glitches
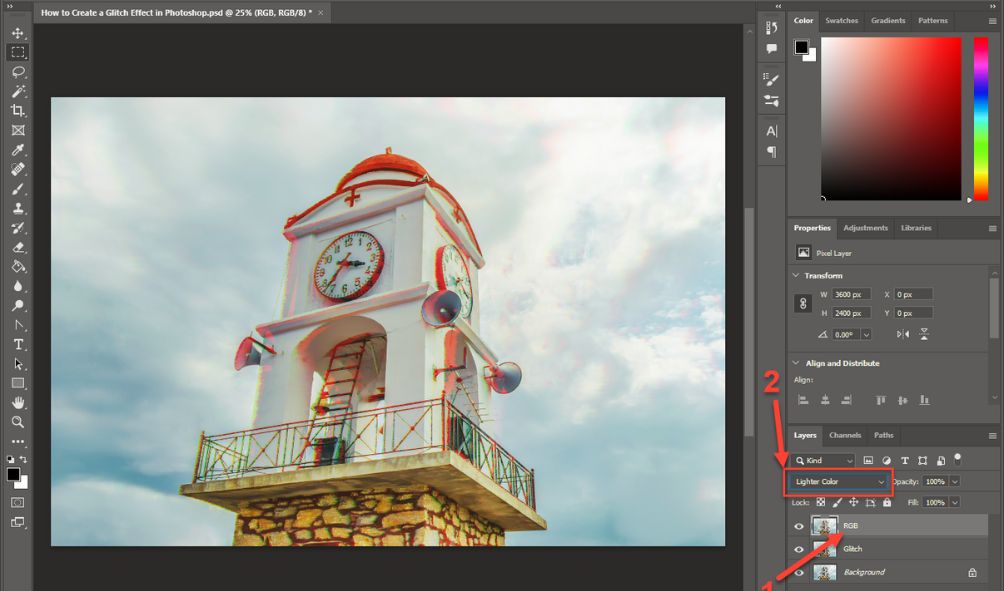
The Offset filter provides a straightforward way to create displacement glitches. By shifting pixels horizontally and vertically, you introduce a jarring discontinuity, creating the appearance of data corruption. To use it, open your image in Photoshop, duplicate the layer (for non-destructive editing), and then go to Filter > Other > Offset. Experiment with the horizontal and vertical offset values. Large values create more pronounced glitches, while smaller values result in subtler effects. Note that the edges of the image will wrap around, creating a repeating pattern, which can enhance the glitch effect or be undesirable, depending on the desired outcome. You can further refine the effect by using a layer mask to selectively apply the offset to specific areas of the image.
Liquify Tool for Subtle Glitches
The Liquify tool offers a more organic approach to glitch creation. It allows for precise manipulation of pixels, enabling the creation of subtle distortions that simulate minor data corruption. Access the Liquify tool by going to Filter > Liquify. Use the Forward Warp tool to gently push and pull pixels, creating subtle waves or distortions. Focus on creating small, localized distortions rather than large, sweeping changes to maintain a realistic glitch effect. Remember that subtlety is key here; avoid overdoing it. The Liquify tool is particularly effective for creating glitches that appear more natural and less jarring than those produced by the Offset filter.
Layer Styles for Simulating Glitches
Layer styles can be used to simulate the visual characteristics of glitches without directly manipulating the image pixels. For instance, applying a Drop Shadow or Inner Shadow with exaggerated settings can create the illusion of pixels being displaced or misaligned. Experiment with different blending modes, opacity levels, and shadow angles to achieve various glitch styles. A combination of multiple layer styles can create a more complex and visually interesting effect. For example, using a combination of inner and outer shadows with different colors can mimic the effect of data corruption bleeding through different color channels.
Transform Tool for Warping and Distorting Images
The Transform tool provides powerful capabilities for warping and distorting images, allowing for the creation of dramatic glitch effects. Duplicate your layer, select the layer, and then choose Edit > Free Transform or press Ctrl+T (Cmd+T on a Mac). Experiment with different transformations, such as Skew, Rotate, and Warp, to create various distortions. You can also combine multiple transformations for more complex results. To create a more fragmented glitch, you can select portions of the image using the Lasso or Marquee tools, and then apply transformations individually to those sections. This method allows for very precise control over the glitch effect, making it ideal for creating highly stylized or specific effects.
Masks for Revealing Underlying Layers
Using layer masks allows for the selective revelation of underlying layers, creating a layered glitch effect. Create multiple layers with different image variations or textures. Then, on the top layer, add a layer mask and use a brush tool with black and white to reveal portions of the underlying layers. This technique mimics the effect of data corruption revealing underlying data or image fragments. The brush size and opacity settings control the size and intensity of the revealed sections, providing precise control over the effect. This technique is particularly useful for creating complex, multi-layered glitch effects that look more organic and less repetitive.
Advanced Techniques
Taking your Photoshop glitch art to the next level involves mastering more sophisticated techniques that go beyond simple filter applications. This section explores advanced methods for creating incredibly realistic and unique glitch effects. We’ll delve into custom brush creation, multi-technique workflows, and the strategic use of adjustment layers and smart objects for non-destructive editing.
Custom Brush Creation for Unique Glitch Textures
Creating custom brushes allows for unparalleled control over the texture and appearance of your glitches. Instead of relying on pre-set brushes or filters, you can design brushes that perfectly mimic the imperfections and artifacts found in real-world glitches. This involves carefully selecting a source image—perhaps a heavily pixelated or distorted image—and importing it into Photoshop’s brush editor. Here, you can adjust settings like spacing, scattering, and shape dynamics to achieve a desired level of randomness and control. For example, a brush created from a scanned image of damaged film could produce a realistic film-grain glitch effect, while a brush based on a close-up of a digital screen’s pixel structure could yield a more modern, digital glitch aesthetic. Experimentation with brush settings is key to discovering unique and compelling results.
Workflow for Combining Multiple Glitch Techniques
The most compelling glitch art often combines multiple techniques for a layered and complex effect. A robust workflow is crucial for managing this complexity. A suggested approach involves starting with a base image and applying a foundational glitch technique, such as the displacement map filter or a channel mixer adjustment. Subsequently, you can introduce additional effects, such as adding noise, using the offset filter, or incorporating custom brushes. Each new layer should be carefully masked or blended to control its impact on the overall composition. Consider the order of operations carefully, as the order in which effects are applied significantly influences the final result. For example, applying a noise filter before a displacement map can produce a drastically different outcome compared to applying them in reverse order. This iterative process allows for fine-tuning and experimentation, resulting in nuanced and visually rich glitch effects.
Comparison of Approaches to Achieving a Realistic Glitch Aesthetic
Achieving a realistic glitch aesthetic depends heavily on understanding the underlying causes of glitches. Two primary approaches exist: simulating hardware failures and mimicking software errors. Simulating hardware failures involves techniques that replicate the visual artifacts associated with damaged or malfunctioning hardware components, such as flickering pixels, scanline distortions, and color banding. This can be achieved using filters, custom brushes, and manual manipulation of pixel data. Mimicking software errors focuses on replicating the visual disruptions associated with software bugs or corrupted data, often involving unexpected color shifts, data corruption artifacts, and pixel displacement. The choice between these approaches often depends on the desired style and mood of the final image. A blend of both approaches, however, can create a more authentic and layered effect.
Enhancing Glitch Effects with Adjustment Layers
Adjustment layers offer a non-destructive way to refine and enhance glitch effects. Layers like Brightness/Contrast, Hue/Saturation, and Levels can subtly alter the color palette and tonal range of the glitched areas, adding depth and realism. For example, selectively increasing the contrast in specific glitch areas can make them stand out more prominently, while adjusting the hue can create a more vibrant or desaturated effect. The key is to use these adjustments sparingly, focusing on enhancing the existing glitch rather than overwhelming it. Utilizing clipping masks can further refine control, limiting the adjustment layer’s effects to only the glitch layer beneath.
Creating Glitch Effects Using Smart Objects for Non-Destructive Editing
Smart Objects provide a powerful way to apply glitch effects non-destructively. By converting the base image into a Smart Object before applying any glitch techniques, you retain the ability to edit the original image at any point without losing the effects already applied. This allows for experimentation and iterative refinement without fear of permanently altering the original image. This is especially valuable when combining multiple techniques, as it enables you to easily adjust the intensity or parameters of individual glitch effects without affecting others. Should you decide to revert to an earlier stage of editing, you can easily do so without having to recreate the entire effect from scratch.
Creating Specific Glitch Styles
Now that we’ve covered the fundamentals of creating glitch effects, let’s delve into crafting specific styles. Understanding these individual techniques will allow you to tailor your glitches to perfectly complement your artistic vision and the overall mood of your project. This section will explore several popular glitch styles, providing step-by-step instructions and examples.
Data Corruption Glitch Effect
This style simulates the visual disruption caused by corrupted data files. The effect is characterized by jumbled pixels, color shifts, and unexpected artifacts. To achieve this, we’ll utilize Photoshop’s transformation tools and layer blending modes. First, duplicate your image layer. On the duplicated layer, apply a series of random transformations, such as scaling, skewing, and rotating, to small sections of the image. These sections should overlap slightly to create a chaotic effect. Then, adjust the opacity and blending mode of the transformed layers to subtly integrate the glitches into the original image. Experiment with different blending modes like “Difference,” “Exclusion,” or “Overlay” to achieve varying levels of distortion. Finally, add noise using the “Add Noise” filter under the Filter menu for a more authentic data corruption look. The resulting image will exhibit a fragmented, distorted appearance, mimicking the visual chaos of a corrupted file.
VHS Glitch Effect
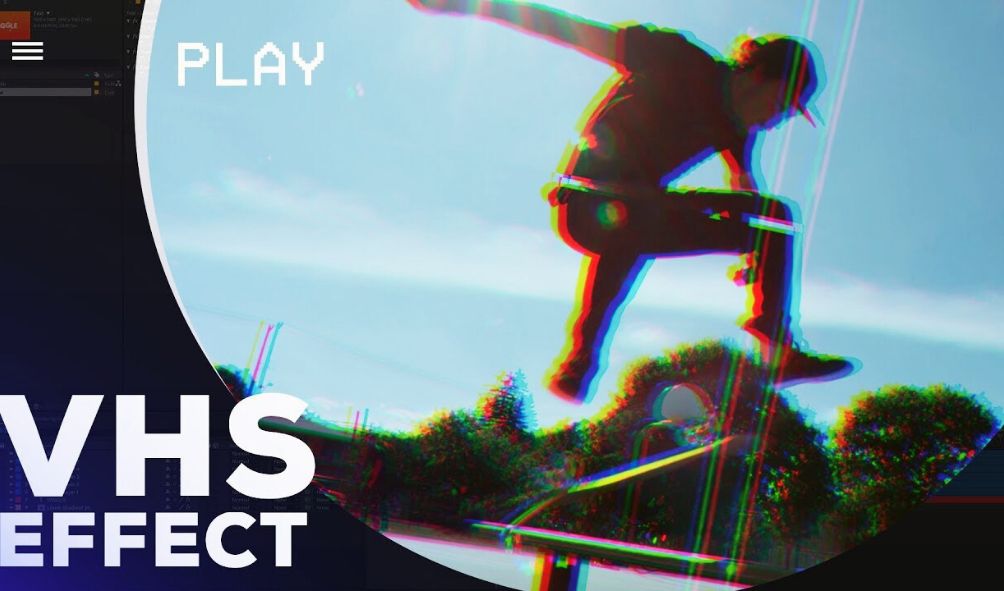
The VHS glitch effect evokes the nostalgic aesthetic of old videotapes, characterized by color banding, flickering, and scanline distortions. We can simulate this by first adding a subtle noise layer to the image, mimicking the grain of old VHS tapes. Next, use the “Offset” filter to subtly shift sections of the image, creating a sense of displacement. This effect can be enhanced by applying a slight color shift using the “Hue/Saturation” adjustment layer. To replicate the scanlines, create a new layer and draw horizontal lines with a slightly darker shade than the background. Adjust the layer’s blending mode to “Overlay” or “Soft Light” to subtly blend the scanlines into the image. Finally, adding a slight vignette effect can further enhance the aged, nostalgic feel. The final product will display a retro aesthetic, reminiscent of the visual artifacts associated with analog video technology.
Comparison of Scanline and Pixelation Glitch Effects
Both scanline and pixelation effects are common glitch styles, but they achieve their distinctive looks through different methods. Scanline effects, as discussed previously, involve adding horizontal lines to simulate the structure of older video displays. Pixelation, on the other hand, enlarges the individual pixels of an image, resulting in a blocky, low-resolution appearance. In Photoshop, scanlines are easily created by drawing horizontal lines or using filters to add texture. Pixelation can be achieved by reducing the image size and then enlarging it again, effectively enlarging each pixel. While both techniques produce a retro feel, scanlines provide a more subtle, textured effect, whereas pixelation offers a more dramatic, almost abstract distortion. The choice between these methods depends entirely on the desired level of visual disruption and the overall aesthetic goal.
Glitching Text Effect
Creating a glitching text effect involves manipulating the text layer itself to simulate data corruption. Start by creating your text layer. Then, duplicate the layer multiple times. On each duplicated layer, apply different transformations such as scaling, rotation, and slight offsets. Adjust the blending modes and opacities of the duplicated layers to create a layered, overlapping effect. The result should be text that appears to be slightly broken, shifted, or distorted, reflecting the common visual anomalies of a digital glitch. Experiment with different fonts and colors to further customize the effect. The resulting text will appear visually disrupted, mimicking a digital signal interruption.
Glitch Effects for Specific Image Types
Glitch effects can significantly enhance various image types. For example, applying a subtle data corruption glitch to a portrait can create a surreal, almost otherworldly effect, emphasizing the subject’s features in an unusual way. The chaotic nature of the glitch contrasts with the subject’s stillness, adding a compelling visual tension. In contrast, applying a VHS glitch effect to a landscape photograph can evoke a nostalgic, almost dreamlike atmosphere, transforming a mundane scene into something more evocative and mysterious. The subtle distortions and color shifts can create an interesting visual texture, enhancing the overall mood and story the image tells. The appropriate glitch style depends on the image and the desired artistic outcome.
Illustrative Examples and Visual Guide
Let’s solidify our understanding of glitch effects with some visual examples and detailed descriptions. The following table provides a concise overview of various glitch types and their creation methods in Photoshop. We’ll then delve deeper into the visual characteristics of three specific glitch effects.
| Glitch Effect | Method in Photoshop | Visual Appearance | Description |
|---|---|---|---|
| Pixel Sorting | Using the Offset filter and potentially masking | Disrupted image sections with rearranged pixels | Sections of the image appear scrambled, with pixels shifted and rearranged in unpredictable ways. |
| Scanline | Utilizing the “Add Noise” filter and layer blending modes | Horizontal lines disrupting the image, potentially with color distortion | Horizontal bands of color or distortion appear across the image, mimicking the appearance of old television or monitor scanlines. |
| Data Corruption | Employing the “Offset” filter repeatedly, combined with noise and color adjustments | Random pixelation and color artifacts across the image | The image shows random pixelation, blocks of color distortion, and unexpected artifacts, simulating the effect of corrupted data. |
| Color Banding | Adjusting color levels and using posterization | Visible bands of solid color, often with abrupt transitions | Smooth gradients are replaced by distinct bands of solid color, resulting in a posterized, less nuanced image. |
Pixel Sorting Glitch Effect
Pixel sorting creates a visually jarring effect. Imagine a section of your image, perhaps a face, where the pixels are not in their original order. They’re shuffled, rearranged, creating a chaotic, almost abstract pattern within the affected area. Color shifts are often present; a person’s skin tone might be fractured and scattered across the region, resulting in a mosaic-like appearance. The disrupted patterns are unpredictable, leading to a surreal and fragmented visual. The effect can range from subtly disorienting to completely unrecognizable, depending on the extent and randomness of the pixel rearrangement.
Scanline Glitch Effect
The scanline effect is characterized by the appearance of horizontal lines across the image. These lines aren’t necessarily perfectly straight or evenly spaced; they might be thicker in some areas, thinner in others, creating a sense of irregularity. The color distortions accompanying scanlines can range from subtle shifts in hue to complete color disruption within the affected lines. The lines can overlay the image content, partially obscuring it or even completely replacing sections with solid color bands. The effect often evokes a feeling of retro technology, reminiscent of older video displays.
Data Corruption Glitch Effect
A data corruption glitch presents a more chaotic and unpredictable visual. Instead of organized patterns like pixel sorting or scanlines, data corruption introduces random pixelation. Imagine small blocks of pixels changing color or becoming completely scrambled, almost as if the image data itself is being lost or corrupted. These random color artifacts can be various colors and sizes, creating a fragmented and visually noisy effect. The overall appearance is one of visual instability and decay, reflecting the unpredictable nature of data corruption.
End of Discussion
Mastering the art of creating glitch effects in Photoshop opens doors to a vibrant spectrum of creative expression. By understanding the underlying principles and employing the diverse techniques outlined in this guide, you can transform ordinary images into captivating works of digital art. Experiment with different methods, explore various glitch styles, and refine your skills to achieve the unique aesthetic that best suits your vision. The possibilities are as limitless as your imagination.
Read More:
- Best Dry Brush Watercolor Tutorial for Beginners in 2025
- 10 Unique Art Ideas: Explore Creative Expression
- How to Start a Resin Art Business: Best Guide for Beginners in 2025